Wednesday, August 31, 2011

Curved Piecing- the Enemy!

Once, a long time ago, my mom read about this "easy" curved piecing technique.  It involved glue sticks and freezer paper and I'm sure it really is much easier than the old method of curved piecing (whatever that is).  We tried it together, and my result was this heart pillow (previously seen here).


My pillow turned out fine, but I found the procedure to be sufficiently painful that I have since avoided curved piecing.  Total shout out to the people who make such lovely quilts that way.  My mom, on the other hand, seemed to like it and has made many things using the technique including an entire round wall quilt.

Fast forward to last Christmas. Having successfully made our gradient dyed fabrics and tried out the Shibori-style technique, I decided to make a wall-hanging using the results.  I thought I would give curved piecing another try so I drafted a leaf pattern, to match my tie-dyed piece, and used the same piecing technique as with the pillow.  Alas, it was a big painful mess.  I got it all pieced but was very grateful it wasn't a full quilt.  I decided the blocks were kind of boring with all the solid (albeit gradient) fabrics, so I cut them up and mixed them around.  I added a small strip to accommodate the parts of the pattern that would be lost in seam allowance after cutting and reassmebling, and the pieces lined up ok, but not quite perfect.  Here's the top.  I really love the way the tie-dyed leaf came out, I'm kind of ambivalent about the pieced leaf blocks on either side.  I'm actually kind of sad I used up all the gradient pieces making the leaves since I think I'd rather have saved them for something else.


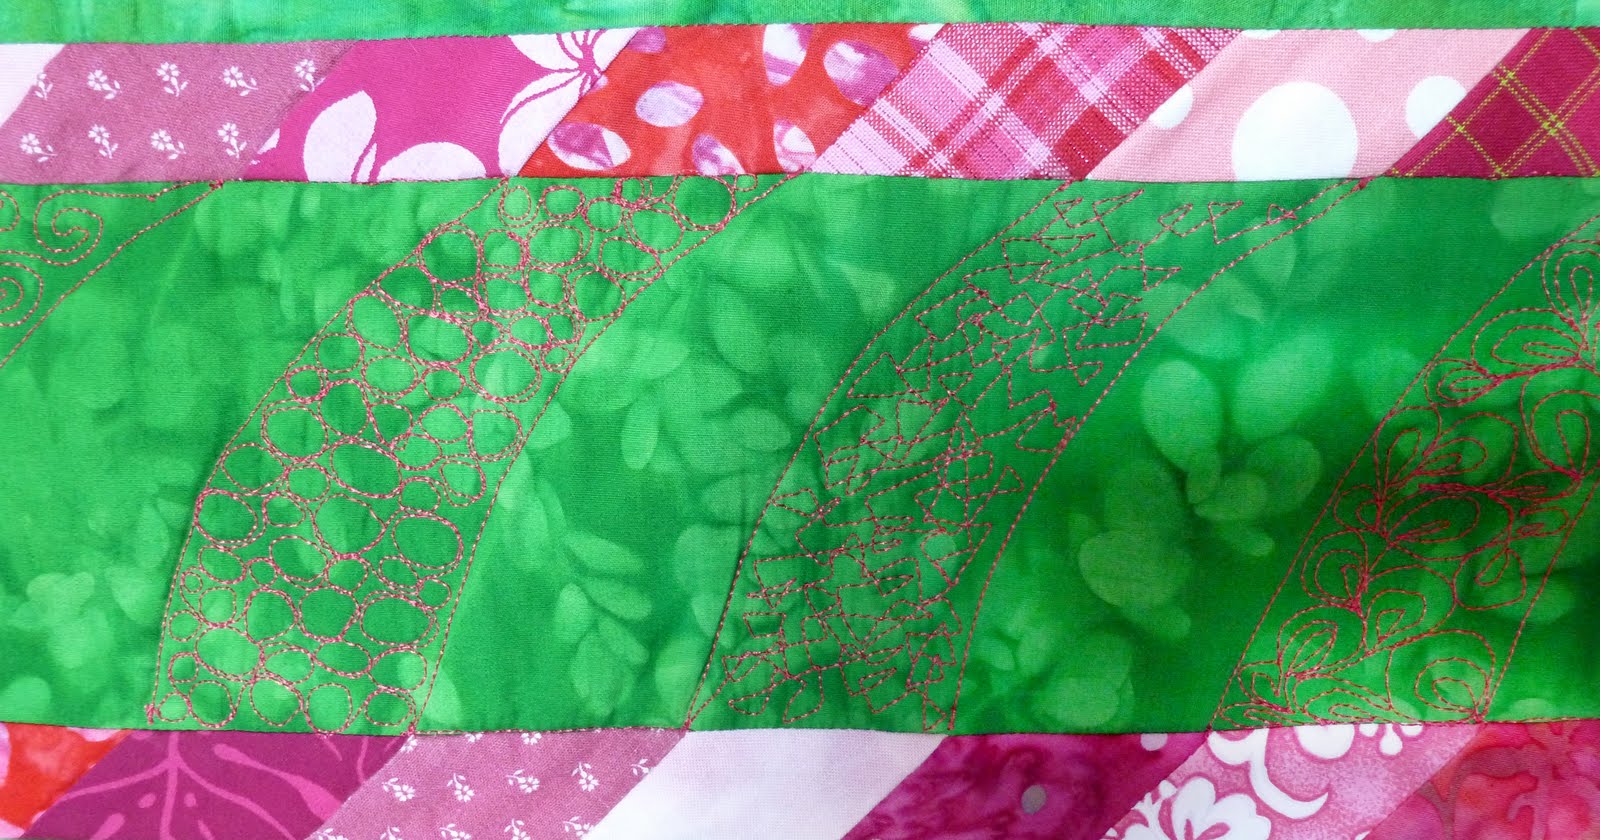
I free-motion quilted it on my home machine; I just treated it sort of like a sampler.  It was good practice (I can never get enough quilting practic) and I actually like it much better after quilting it.  I think the quilting adds some interest to the plain leaf blocks.


This curved piecing experience painfully intruded on my consciousness again this year when we were at Asilomar for quilt camp. One of the things we learned in Caryl Bryer Fallert's class (discussed here, and here) was her appli-piecing technique.  It's a combination applique/piecing technique specifically designed to enable one to avoid regular curved piecing.  I got so excited and mentioned to my mom that it would have been a great approach for this leaf wall hanging.  She replied that she'd learned a similar technique in a class by Vikki Pignatelli.  When I asked when she'd taken that class, she replied vaguely that it had been a few years.  Really?  Really? As in before the horrid curve pieced leaf extravaganza?  Why yes.  My dear mother watched me flounder and struggle with the curved leaf pieces all the while having stored in her brain the perfect alternative technique.  Apparently, she had forgotten.  Ahem, not one of your finest moments Mom.

Anyone else have a technique they're just not crazy about?

Monday, August 29, 2011

Easy Gradient Dyeing

My mom has done a variety of fabric dyeing experiments, in many cases with great success.  I'd never really tried it though and don't really have a space in which to make that kind of mess.  I was inspired however by the easy do-it-yourself gradient dyeing article in the December/January 2010 issue of Quilters Newsletter, so last year at Christmas my mom and I tried it out.  She has a large pottery studio attached to her gallery which provides the perfect place for trying out messy projects.

The first step was to wet your prepared-for-dying fabric (from Dharma, along with dyes and soda ash) and spread it out on a plastic bag.  Then fill up a 1 oz squeeze bottle with your dye mixture and squirt it along the top of your fabric.  When half the dye is gone, fill the bottle with water (effectively diluting the color) and dye the next part of the fabric.  Repeat until out of fabric.  It worked really well actually and we made several pieces of different colors.

Here's my mom demonstrating the technique, as well as some of our results.  That's Jackson the carpet dog in the picture with my mom, so-called because his fur feels like a berber rug.  It's a good think we didn't dye him- he'd look like a circus clown.


I was really pleased with the way our pieces turned out.  There seems to be quite a bit that goes into dyeing though, especially if you're trying to get specific colors.  True blue and true red both seemed elusive, although green, turquoise, and purple were easier.

During that same week, we also tried some dyeing based on a Japanese Shibori technique.  There are a lot of ways to do it, and I'm not an expert by any stretch of the imagination, but it's basically really advanced tie-dying.  You stitch, gather, fold, and tie the cloth and then dye it to give cool patterns.  My mom made a little mountain sort of scene with hers while I did a sort of abstract leaf.  Up next, I'll show you what I made with them.


Thursday, August 25, 2011

Pouches-the Camera Case

I promise I'm not going to have pouches every week, but I've discovered they're a fun way to try out new piecing ideas.  This time, I thought I'd play around a little with bias strips since I've never really done that before. When Mike told me he'd ordered a new camera and wanted the old camera case for it, I knew it was the perfect chance to make a camera pouch.  I decided to make a snug case to hold just the camera (for dropping it in my purse on the go) and a larger pouch which would hold the camera-in-pouch as well as the charger, cable, tripod attachment etc.

I cut out a square of linen big enough to cut all my pouch pieces from and cut a bunch of bias strips in colors that coordinated with my inspiration print (the one with the little circle-like things on the black background).  I'm not sure if there's a "right" way to work with the bias strips, but I attached them sort of like a binding would be attached.  I folded them in half, sewed the raw edges down using a scant 1/4 inch seam and then flipped the fold over and top-stitched it down.  I like the dimensionality of the strips- since there are effectively four layers of fabric in each strip (not counting the background) they really stand out from the surface but it made for some added bulk when sewing the pouch together later.  If I were to use these strips on a real quilt, I think I'd hand sew them down or blanket stitch along both sides as I don't really care for the top stitching.  

I just added bias strips until it felt like enough.  Maybe too many. 


Mostly I included this one because of the random appearance of the adorable Bentley.


After sewing down all my strips, I quilted the top to a layer of white flannel (to provide some cushioning without the bulk of batting).  I then cut out the pouch pieces, roughly following these tutorials for the boxy pouch and the camera pouch. Both tutorials were good, the only thing I didn't care for was that there are seams visible inside the boxy pouch.  I lined both with a green hawaiian fabric which coordinated with the bias strips.


Both turned out well, I love the colors and the neutral background.  The biggest problem I encountered was that since the placement of the bias strips was pretty random, many overlapping bias strips wound up in corners and seams.  This really increased the bulk; it was quite hard to sew through in some spots.  This also contributed to some unevenness in the corners; the bulky ones don't lie as flat or turn out as evenly as the ones without strips caught in them.

Linking up today over at Travel Handmade. You should check it out!

Travel Handmade with The Sewing Summit

Wednesday, August 24, 2011

Starflower: Part II

After finishing the piecing and marking, I loaded my quilt top onto my mom's old voyager so I could quilt it.  I did a pattern of free-motion vines with leaves and flowers in the background of the star; since the print is so busy you can't really see the quilting at all.  I spent more time working on the quilting in the setting blocks; I was hopeful that it would stand out really nicely like it did on One Hen, Two Ducks.  Unfortunately, the contrast between the blue fabric and the thread in this quilt wasn't as high as the contrast between the black fabric and the thread in the previous one so it doesn't show up quite as well.  Also, I used a fairly lightweight thread. It's all Isacord which is great thread on the longarm, but it's only 40 wt so with large areas of not-too-dense quilting, you don't see it quite as well as I'd like.  The yellow quilting with the orange sunbursts goes all the way around the quilt as does the white candy striping.  I find when I'm quilting that I go back to the same patterns over and over again; I really need to branch out.


Just ignore the little quilting mistakes and knots; I'm trying to get better about those.  You can kind of see the purplish tinge in the blue setting squares in these pictures.  I really did love that fabric.

Here's the final quilt.  It's really big, big enough to hang over all four sides of my king bed by about 8 inches.  There were instructions for drafting the pattern pieces for each bed size, but I used the same pattern pieces my mom used, and apparently she and my sister had some sort of miscommunication during the measuring stages.  Apparently some measurement was 3.14, and one of them said, "you know, like pi" which prompted a little dyslexia and the cutting of a pattern piece based on 3.41 instead.  It made for some laughs since we're all actually fairly mathy people, but the net result was a couple of very large quilts.  Sadly, it means I don't actually have a picture of the whole thing, this picture was taken at the quilt show in Dallas and the top fifteen  inches or so are flipped over the hanging pole.  The borders do actually go around all four sides.

Starflower, 101" x 101", 2011
I love having it in our bedroom, it makes me happy every time I walk in there.  I find the colors very soothing.

Here's the label I made for it, from a picture I took on a trip to Eureka Springs last fall.  Sorry it's so hard to read.


Monday, August 22, 2011

Starflower: Part I

A while back I decided it was absurd for me to have made all these pretty quilts but have only an ugly old  coverlet on our bed.  Seriously, it was wretched; we had a down comforter covered in a faded, holey, green flannel duvet cover that we inherited from my mom in the pre-quilting days after it got too threadbare for her bed.  It wasn't even the right size.  However, we have a king sized bed and I didn't want to make anything too complicated since it needed to be large and stand up to quite a bit of wear.

When my sister got a book on simple, one-basic-piece lone stars (Easy and Elegant Lone Stars by Shirley Stutz), I thought it would be perfect for a giant bed quilt.  My mom and I actually each made a king sized quilt from this book and my sister made a quilt from it as well.  I really do like the large 8 pointed star motif- for anyone keeping track, this is my third quilt to use it.  The key to getting great motion and visual interest with only one piece for each point is to pick a large repeating pattern.  I picked out my fabric of choice, this Kaffe Fassett print from his spring 2008 collection before I'd seen the book, and it's a little too regular to give good movement, but I love the way it turned out.  I picked a deep but slightly grayed-out coordinating blue for the setting blocks; I like it because even though it's a solid, it has a little bit of shimmer up close.  I picked these fabrics because I thought a more muted color palette would be good for something as big and ever-present as a bed quilt.  I also chose a blue dotted print for the main border and a pinky orange for the binding and small border; both picked up colors from the main print.

The colors are a little brighter than what came out in the picture, but they're pretty close.  Those three tiny scraps are all that I have left from the border fabric.  One of the annoying things about this project was that in order to have 8 matching very large star points, it took quite a bit of fabric and because each point was one big diamond, there was lots of odd shaped fabric left over.


The instructions were very easy to follow, and after assembling the large star, I added the borders.  I drafted some simple New York Beauty blocks for the corners and fussy cut flowers from my main print to fit the each corner of the block.


After assembling the top, I laid it out on my living room floor and marked some large quilting guidelines.  I wanted to have an overall circular pattern flowing through the background, you can kind of see it in my white pencil marks below (sorry for the crummy iphone pic).


Stay tuned tomorrow for the quilting and the finished product!

Friday, August 19, 2011

Hawaiian Applique Part 2

Anyone interested in the trials and tribulations of making a horrible quilt should read the first part of this saga (posted Wednesday).  As part of the I-have-no-idea-what-I-was-doing aspect of this project I decided somewhere about halfway through the quilting that I would add a border of grosgrain ribbon to the edge of the quilt.  Some fabulous quilt teacher (I can't remember which one) suggested that as a way to prevent your top from stretching and getting unsquare.  In my case, I think the whole quilt was so out of whack that it didn't make much difference, but it seems like a good idea when applied correctly.  I bound the quilt in some basic green and then discovered the final ignominy.  When I hung the dratted thing on the wall to photograph, the whole middle pooched off like a beer belly!  It was horrible! I wound up wetting the whole thing down then pinning it with a bunch of straight pins straight to the wall (I can't imagine how many holes are in my drywall) and steaming and steaming and steaming some more until it flattened/shrunk up.

In any case,  here's the final quilt.  The worst part about the whole thing is that I really like the design; I like the large green Hawaiian block on the black, and the green and pink borders, and the visual impact.  I just wish the construction wasn't so awful!

Untitled Hawaiian Applique, 38" x 53", 2011

And the final straw is the size;  It's too big to make a nice sized wall-hanging and too small for a bed quilt.  I will hang it on the wall though, after all this trouble, I want to be able to see it.

I'm really glad I persevered and finished this, if only to cross one more thing off my list.   And in spite of the headache, I love the bright green and pink.

So, an update on the summer-time UFO list:

1. Purple Medallion Quilt:  Status- top pieced, needs to have faux trapunto and machine quilting.
2. Hawaiian Applique Quilt: Status-top pieced, sandwich made, some quilting done.  Needs to have Zendoodling quilting done and finished.
3. Dog Portraits: Status- two dogs thread painted, need to finish thread painting, assembly, and quilting.
4. Nativity Mosaic Quilt: Status- Mary and Joseph are mosaic-ed, everyone else needs to be tiled in and finished.
5. Visions of God Group Church Quilt: Status- All the blocks but 3 are sitting in a pile on my desk.  I need to get  three more blocks and then assemble/quilt it.
6. Large S Quilt: Status-Top is finished, needs to be blocked and quilted.
7. Small Caryl Fallert Blocks: Status-Miscellaneous blocks need to be quilted/finished and donated.
8. Grandmother's Flower Garden Project: Status-Not even sure what this is going to be, but I have been piecing a bunch of grandmother's flower garden blocks and need to do something with them.
9. Miniature Whole Cloth Quilt: Status-about 2/3ds finished, need to find some ribbon to quilt with and maybe some perl cotton.


I know the summer is progressing quickly, but completing three relatively substantial projects so far seems like pretty good progress to me.  I've been working on #9 here and there as we go, and the next big project to get back to is number #3.  The dog portraits are going to take a while though, probably several months, but we'll see.

So what about you: any of you guys have projects that just went wrong from beginning to end?  How'd you deal with them?  Complete them anyway, throw them away and start something new, set them on fire?

Wednesday, August 17, 2011

Hawaiian Applique Part 1-More UFO Progress

You guys-  sorry for the momentary lapse into narcissism, but I'm so proud of myself for finishing this project!  I start this quilt in 2007 after getting back from a trip to Hawaii.  It was a challenge from the get-go. My mom has this Hawaiian Applique book by Vicki Fleming and I thought I'd give it a try since I think the intricate designs and blocky color in good Hawaiian quilts are just beautiful.  Did I know how to hand applique?  No I did not.  Did I particularly enjoy hand sewing?  No I did not.  Did I enjoy turning things under? No I did not.  So, of course the logical next step was not to try some small hand applique, or even to try a small Hawaiian applique block.  I decided to make a giant Hawaiian Applique.  Everyone needs a GIANT HAWAIIAN APPLIQUE (cue Jaws music).

I blew the pattern up so that it filled a 36" square (I'd bought a yard of the fabric I wanted to use as a background) and started in.  I encountered so many problems along the way, I cannot even remember them all to catalog them here.  Many were made worse by the fact that at the time I started this project I was such a baby quilter, I didn't even have many basic skills or resources (glue stick anyone?).  I tried pinning the applique: it squirmed around.  I tried doing the actual turn-under hand stitching and made it approximately 6 inches before, ahem, giving up on that.  For some perspective, photoshop has just informed me that the perimeter of my applique block with all its twists and turns is 497 inches.  Yeah.  Finally, I did some weird combination of ironing the whole thing onto fusible while still trying to maintain the turned under edges, adhering it to the background and then blanket stitching around the applique motif with my sewing machine.  The motif was attached but did not look good.  I then added some pink strip-sets cut on the bias to the top and a couple of borders.  I had wanted the strip sets to look like chevrons, but I didn't cut them right, so now they just look like slightly offset slashes.

After all that, I layered for quilting and started in.  I thought originally I would do some echo quilting like on a traditional Hawaiian applique, so started inside the block.  It was disastrous.  I will not even show close up photos of how awful it was.  I had a very hard time moving the largish quilt (38 x 55) under my little sewing machine.  Then the thread broke every two inches, mostly because I was jerky and not smooth.  Being extremely frustrated, I set aside the quilt for oh, a couple of years (!).

When I next picked it up, I thought I was much more advanced, further evolved etc. but when I started trying to quilt largish feathered wreaths (don't ask me why I picked that) in light pink thread on the black background, it was horrendous!  The thread was still constantly breaking, the feathers were jerky and not smooth ACK!  I was so frustrated I was sure there was something wrong with my sewing machine.  I took it in twice, and each time they said it was in great working condition, no problems.  Even I had to admit it sewed fine on everything else.  Of course I had to rip out all the ugly pink stitching, it was horrible, and knotty and really really hard to get out.

In the end, I decided to mark a grid of 4 inch squares on point on the background, and just doodle quilt in them in a dark green blendy thread. I figured that 1) if I was doodle quilting, I would be smoother than if I was trying to follow a pattern, 2) if I was working only in a small 4 inch square, I wouldn't have to move the quilt as much and could be, again, smoother, and 3) if I used a dark thread it wouldn't stand out as much if it was horrible.

This approach actually worked out ok.  My doodle quilting took a long time but filled in the background nicely.  I used varying shades of pink thread to outline the alternating rows (so there's not so much doodling all together) and finally got all the background quilted.  Here are some of my doodles.  Pardon the bad photos, it was really hard to get in focus shots of the dark green on black.


After finishing the background quilting, I had to go back and finish the echo quilting in the green applique block since I had left it unfinished before.  I had hoped that my newly honed skills would make it go more smoothly, but alas no.  In fact, it looks even weirder than before, because I didn't have quite the same shade of green thread.  So all the leaves are quilted poorly, and two of them are a different green than the rest.

I then quilted small feathers in the pink slashes in the top border.  In the bottom border, I used my flexible curve ruler to draw a line of curves.  In each curve I put one of my favorite easy filler patterns.  Is it wrong that this green border is my favorite part of the whole quilt?


Sorry for the long, ranty post.  Stay tuned Friday for the final quilt.

Monday, August 15, 2011

Flamingos!

I found this great block when I was cleaning up yesterday, it was actually one more from Caryl Fallert's class.  This time an exercise in combining paper piecing, curved applipiecing, and the use of contrast gradients.  I used two intersecting gradients; as the pink gets darker, the grey gets lighter.

  I think flamingos are pretty aswesome;  all pink and curvy and incongruous (unless you live in Africa or South America).  I'd been wanting to do something with this flamingo print I'd bought a long time ago, but in spite of their pinkness and coolness, my quilts don't often call for flamingo prints.  Here though, they fit in great.  I love the pink and grey pairing with just a pop of yellow to bring out the flamingo beaks.


I added some pink and black borders to make it a little bigger and then layered it for quilting.  This time I took the spray baste outside, no more sticky overspray in the house.  That stuff is persistent.

Since bright pink seems to be my color scheme lately, and the curvy bit reminded me of a flamingo neck, I thought I would quilt a flamingo into the background.  I lightly drew the outline with washable pencil and then quilted over it in bright pink thread (highlights from Superior).  I went over it several times so the flamingo would stand out nicely.  I then quilted him a little grey pond with pebbles and added some straight lines contrasting in the background.  Ta-da, mini flamingo quilt!  The block is about 8 inches square; with the border the finished wall hanging is about 15 inches or so.  I used more of the flamingo print for the binding.  I tried really hard to have smooth quilting with no birds nests or ugly starts and stops.  I'm slowly getting better!


Hope you enjoy!

Friday, August 12, 2011

Easy Friday Project-Phototransfers

Since it's Friday I thought I'd show a quick-easy-do-it-in-an-evening project.  I've made quite a few of these photo-transfer projects over the years.  These were all made with the inkjet printer fabric you buy at JoAnn's although recently I've been experimenting with the products that enable you to make your own printable fabric.

Usually I just print a picture, add some borders and then either quickly quilt it up into a wall hanging or make it into a pillow cover.  Easy-peasy personalized present! Here are some of them;


These are Mike's adorable grandkids Raegan and Walker, I made them these pillows for Christmas last year. Walker loved Thomas the Train.


I made this one for my grandmother using photos that were left over from making a memory quilt for my grandpa.  It's been well sat on I think.  

Here's one I made into a wall hanging and kept after my sister and I had our cousin out to visit a couple of years ago.

And here are three more pillows I made for my mom and some good friends commemorating a great ski trip.


The phototransfers make great wall hangings and birth commemorations and quick memory projects.  There are all kinds of cool digital manipulations you can do with photos and fabric, but even just printing them out and sewing them into blocks like this makes a fun project.


Wednesday, August 10, 2011

Pouches-Round 2

I decided to try another pouch, hopefully with better results than the last time.  I took the same basic assembly steps, but because this one is to be a birthday present for a good friend, I used a slightly simpler block in the hopes that it would go together better.  I chose to do a cream/purple color scheme and instead of patchwork I did a sort of window-motif-applique thing.  I know this technique has an actual name, I just have no idea what it is.  Basically, the base of both pouch sides is the cream tone-on-tone print while one side has the flower pattern appliqued on and the other side has the "window" leftover from cutting out the flower pattern appliqued on.  I just drew half the flower pattern freehand onto folded paper-backed fusible web.  Folded so that I would get matching halves, and fusible so that I could tightly affix the appliques before stitching.

Here's what the basic sides looked like after fusing the pieces. Each piece is about 7 1/2 inches square.


After fusing, I blanket stitched around the motifs with a matching purple thread then assembled the pouch.  Like the other, it does have a lining, I just didn't take a picture of the lining fabric.


It definitely came out better than the last one, I'm really pleased with the purple and cream and hope my friend likes it.  Without all the tucks adding bulk, the zipper went in much better, but the top corners are still a little weird.  I have to work that out next time, but I think I know what the problem is so it shouldn't be too hard.  These really are fun, and not too hard to make.  I've really enjoyed trying some different types of piecing for these so far without committing to something big and complicated.